
We originally bought a white muslin backdrop and tried to make it work with a couple of strobes, but it was dang near impossible to get the background to be totally white or smooth. I read a bunch of books on lighting and saw a few articles in Popular Photography on the white background shots, but it never came together for me until I decided to Google it and found a really informative series of blog posts by Zack Arias. He explains exactly what to do with clear instructions and examples, so I just tried to follow his lead.
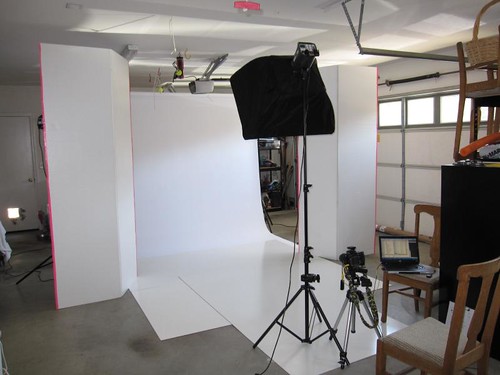
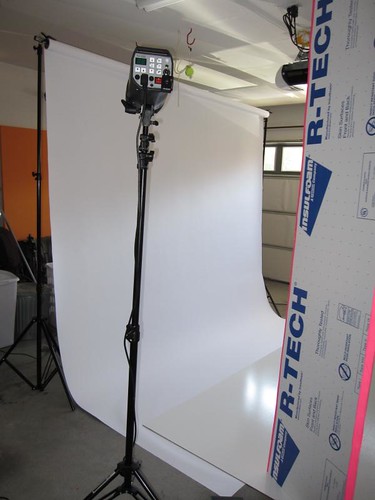
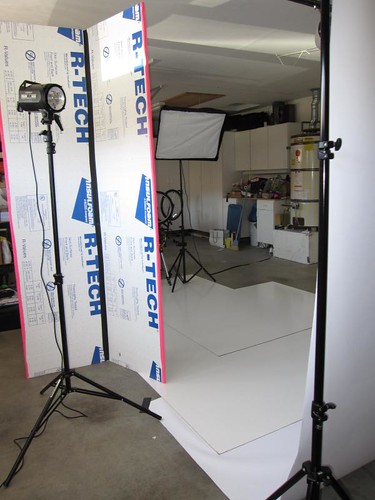
Like anything related to photography, we had to go procure some stuff before getting started. The key components were a roll of Savage 9-foot white paper from Amazon.com, a few sheets of Thrifty white tile board from Lowe's, and a couple of 4x8 sheets of 3/4 inch white styrofoam insulation that were split in half and taped back together with gaffer's tape to make two bifold screens. A few months ago I bought a couple of Elinchrom Style RX600 studio flash units with the EL-Skyport studio control system, and we had to pick up one more before doing this project because it really takes three strobes to get the full effect. The front strobe was modified by a Westcott 24x32 softbox with a silver interior, which makes a nice soft light.
One of the challenges was figuring out exactly how to get it all set up and optimized. We originally thought we'd try this in our family room, but it wasn't nearly big enough. I then moved out to our garage, and even then I had to set it up twice to get enough room. When Zack says this needs a 20x20 foot space, he isn't kidding - this really requires the capability to spread out. We wound up using a 16x18 foot chunk of our garage, and probably could have used even a little more. Unfortunately we can't leave it set up all the time because we park our cars in the garage, so we will have to do the setup/teardown whenever we want to shoot with the seamless white background. Now that it's been done once, I'm optimistic that the next time should be MUCH quicker.
Another big hurdle was getting the lights in balance. The background is basically overexposed, which is what makes it pure white. In our 4th of July shots the girls were standing about 6 to 8 feet in front of the backdrop, and were exposed about a stop and a half less than the backdrop. The placement of the lights, screens, and subjects are all critical factors in getting the effect to work properly.
One other factor I almost forgot to mention is the camera itself. When shooting with these studio strobes, the camera is in full manual mode. For these shots the shutter speed was 1/250 in order to sync with the strobes and the ISO was set to 200 to get the highest quality image. This just left the aperture to be adjusted, and that was set to F9 to get the depth of field M3 wanted. The strobes were then adjusted to get the proper exposure, and our Sekonic FlashMaster L-358 light meter really helped to get everything in the right ball park. All told it was about six hours of setting up, tinkering and tuning before the photo shoot started. We'll try this again when D2 and family come for a visit later this summer, and I'm looking forward to D2 having lots of good ideas on perfecting the setup!
Here's what it all looked like:
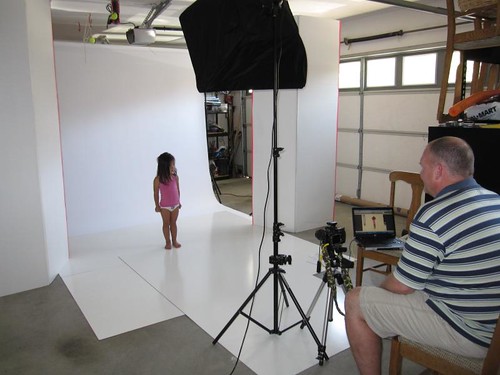
M3 was also dying to to try connecting the D300 directly to the laptop via USB, which is shown above. I downloaded a trial copy of Nikon Camera Control Pro 2, which allows the camera to be controlled from the laptop and also stores the images there for instant feedback. The small monitor on the camera didn't give enough feedback on the setup so we tried the software. It's a lot slower, but that may just be the old laptop and slow USB. We'll see if we decide to buy it.
Once it came time to start taking pictures of the girls, M3 and her creative instincts took over. While I was setting up the "studio" she had gathered up a bunch of props and developed some ideas about what to do with the girls. She kept them moving and changed the props (she called them "toys" to the girls) out very quickly (maybe only a minute and a half per prop). The wireless shutter release we have for the camera let her get away from the camera body so she could keep things moving. Her idea was to just get the girls in and out quickly before they got frustrated or stopped cooperating, which is really hard to do at a studio somewhere else. She also wanted "normal" photos where the girls were interacting with each other or their props without having to stand in one place and smile. She talked to them the whole time (using the camera remote so she could maintain good eye contact with the girls), asking questions, telling jokes, doing funny things, asking if they'd like to do a certain thing, and frequently reminding the girls that the last shot would be a "candy shot." This type of control, and the resulting happy girls who are comfortable and willing to play around and show their true personalities, is what got us started originally on wanting to do all of this ourselves, by the way.
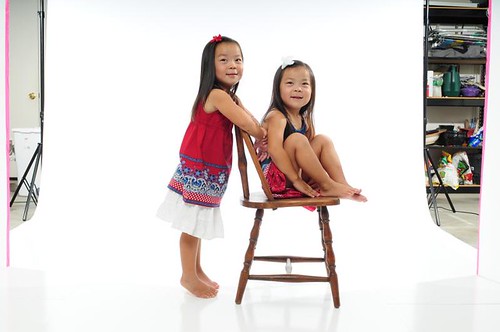
The actual photo shoot probably only took 8 or 10 minutes, and the lighting was set up well enough that the only real post-processing was cropping the photos and making little tweaks to exposure and compensating for the strobes that didn't fire in a few of the shots. This is what a couple of the more technically correct shots looked like straight out of the camera:
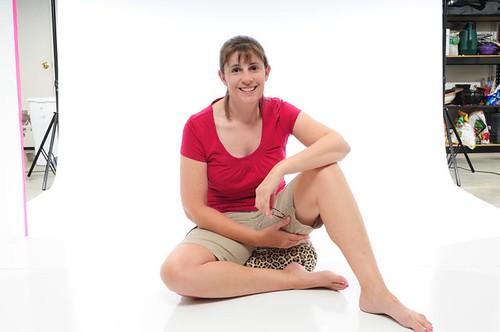
While we had everything set up, M took a great shot of me and my tuba.

After doing this, I broke down and ordered an EL-Skyport USB transceiver for the flash control system. It will enable us to adjust each strobe from the laptop, so tweaking the strobe levels will involve a lot less running around. It also saves the configuration and settings, which will make it easier to get set up the next time we do this. This was a pretty big investment in time and money, but I think we've gotten some shots we wouldn't have gotten anywhere else and we'll continue to use the equipment for years. Plus, it was a fun project to figure out and we've learned a lot about lighting and exposure!
PS: M says she doesn't have on any makeup in the above photo and her wet hair is scraped into a ponytail, so please realize this photo is included for informational purposes only, and not because she has any delusions of hotness (her words).


About as professional as it gets. I am incredibly impressed with your perseverance. The series of photos shared a day or two ago were magnificent. The two of you have done a splendid job of capturing the girls personalities.
ReplyDeleteThanks for the detailed description.
Hoy moly. That is amazing. We wouldn't even know where to begin with that. You two are good together.
ReplyDeleteYou need to start up your own studio now. You are extremely talented with this and you have all the tools now! You would be a fab photographer for all of us frustrated moms who hate the "profesional" photos from the mall.
ReplyDeleteGreat work you guys.
I really enjoyed reading this post! You guys did a fantastic job!
ReplyDeleteOh and M3 I wish I looked that good w/o makeup on!!
Well, the results were worth the effort! The photos are great. If you ever take this show on the road, I've got a garage you can set up in! :)
ReplyDeleteWOW!! Mike was admiring the shots the other day and was wondering how you guys did it...now I can show him! Great post!! Oh and GREAT pictures too!!
ReplyDeleteThat us sooooooo awesome. I just bought my d40 a few weeks ago and I do not know if I will EVER get this advanced but boy do I love reading about ti, thank you SO MUC?H for sharing!@!
ReplyDeleteTrennan will be here in October. He hated the photo shoot a Sears. Let me know if you are taking appointments.
ReplyDeleteAwesome photos! The girls personalities really shine!
Jaja
Wow. What a lot of work! That is a great pic M3 took of you with your tuba! Those pics were well worth all the effort it took.
ReplyDeleteYou need to stop parking the cars in the garage and set up a studio; I bet you'd be booked for months within days. Amazing photos; I especially like the instrument shots, both the one of TubaDad and the series of the girls.
ReplyDeleteAmazing!
ReplyDeleteSo when are you taking appointments?
Whoa, amazing!
ReplyDeleteI loved M3's "hotness" comment, made me laugh. Heck gal, if I could look that good on my best day ....
Oh, and yes, about those appointments. I am thinking Sept 1st. Or 2nd. Let me know. ;)
Cheers,
Kiy @ RC&T
WOW!!! great job and great explanation! Your pics are awesome and so much better then the studio shots. Like everyone else said, Let us know when you need more models and we will be over to get some new pics! M3 is funny and yes, you are "hot"!!!Tubadad has his own hotness going on in the tuba shot too! Another great shot would be to get that black and white newest member of your family in the all white background!!!
ReplyDeleteThis is AMAZING! I'm so impressed with your research and can not wait to see the shots you will get with this. I see a bit of the reflection in the tuba photo, and have seen some great work done when a sheet of plexiglass is placed on the floor below the chair/stool of just bare feet, just another option... you know, when you can't figure out what needs to be purchased next. ;-) And just in case my original WOW factor got lost - WOW!!
ReplyDeleteWow. My brain hurts and my mind boggles. You two are amazing! I'm lucky if I even remember to take a picture - or even bring the camera!
ReplyDeleteSo complicated and complex!
ReplyDeleteAre ya going to insert background pictures via the computer and make it look like you're surfing or climbing a mountain?
Wow! I am soooo incredibly impressed (but where do you park the car now?). What a bunch of work this was but the results are so worth it! I'm envious as I've been wanting to do this for ages. Most recently, I thought I might try to shoot against a royal blue or grass green backdrop so I could extract the background and put my subject in other settings. Do you know if this is easily done with a white background?
ReplyDeleteLast question: Can we drag the whole family over to your place for our next family portrait?
:)
Donna
Our Blog: Double Happiness!
I'm so jealous!!!! when its winter again I don't knw what I will do without any decent lighting. I couldn'tsee all the pictures or what was getting the catfood because I have dial up and it just chooses what pictures it will load. My little 2 year old from guatemala is a model ALOT, I do bribe with candy so it makes up both very happy.
ReplyDeleteYep! You just about got it right...on TubaDad, you have a little bit of light spillage on the side of his face, meaning he's too close to the backdrop, or the lights on the background are a tad too strong. :)
ReplyDeleteThis lighting setup, "hi-key" is actually one of the hardest to shoot. It's almost impossible to shoot consistently when you do 100% on location (might not have enough room in the room the client is allowing you to use).
Very good job!
and yes....not having to go to a studio with my own kids is what got ME started, which turned into a business...which...OH MY WORD took over my life. ;)
ReplyDeleteHaving a photographer come to your house, while it can be expensive, will always work out better...well, I guess if you actually get someone who knows what they are doing. LOL
Email me if you want to know a few paid forums that are good for starting out and gaining more knowledge (or as my husband says finding new and exciting places to spend your money)
WOW!!!!!
ReplyDeleteCompletely drooling here....WOW, that is a serious set up!!!
ReplyDeleteI am just catching up from a blogfree week and I cannot tell you how much I LOVE your July 4th session with the girls.....might be one of my all time favs,.....well done!!
Have a great week!
Lisa
Oh my - very serious stuff happening here. You are so generous with everything you've learnt too. Thank you for that.
ReplyDeleteAmazing pictures. You really make a great team!
Oh, my... I think I'll just go to Sears Portrait studios!! LOL
ReplyDeleteI am SO ENVIOUS!
ReplyDeleteCan't wait to try it! WAY cool.
Wow! I have always loved your pictures but this is totally over the moon! LiLi's birthday is Oct, I would like an Oct 1 studio date! ;0)
ReplyDeleteI can't believe how hard you worked to get everything just right. Man, I wish I were you neighbor!!!
Take more!!!
Sharyn
That looks like one of the set-ups from Kailee's photoshoots! I'm impressed.
ReplyDeleteWell done for the perseverance, TubaDad! Looks fantastic and i'm sure it works really well. The pictures are slightly too over exposed for my taste but seems like that's the trend nowadays. Of course I'm just saying that because I'm dead jealous, pay no attention.
ReplyDeleteIMPRESSIVE... you two are my new IDOLS!!!! Bow to you both!
ReplyDeleteYou guys are amazing! Well done.
ReplyDeleteWOW! Thank you for sharing! I learn so much from all that you put out there. Really appreciate this info!
ReplyDeleteAnd M3- oh to look like that with no makeup and a ponytail after a photo shoot with my family!
Thanks again!
Wow! What a fantastic tutorial. Nice work. Thanks for sharing!
ReplyDelete