Home       About Us       Salsa Store       Referral       Lifebooks       Recipes       Videos       Blog Headers
Showing posts with label Recipe. Show all posts

Wednesday, October 30, 2013

Creamy white chicken chili

The girls and I are suckers for any food that’s creamy and white (actually I think the girls would exist solely on white foods if left to their own devices). So this creamy white chicken chili is a pretty easy sell around here. I’ve made it and modified it enough times now that the recipe suits our family to a T, and it’s going to be a great pre-candy dinner tomorrow before the main event.
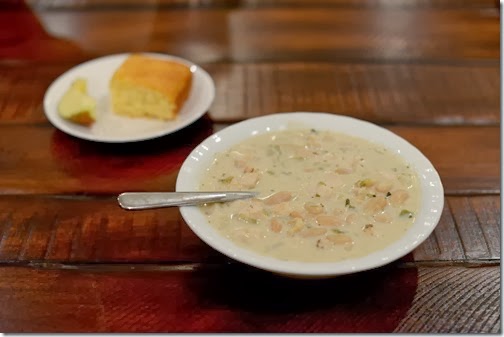
DSC_0364LR

Creamy White Chicken Chili

Ingredients:

  • 1 pound chicken, cut into tiny pieces (I use precooked rotisserie or packaged pre-grilled chicken when I’m in a hurry)
  • 1/2 medium yellow onion, chopped
  • 1 and 1/2 teaspoons garlic powder
  • 1 Tablespoon canola or vegetable oil
  • 2 cans (15oz ea) great northern beans (or cannellini beans, which is usually what I can find at our grocery store), rinsed and drained
  • 1 can (14oz) chicken broth
  • 1 large can (8oz) chopped green chilis (mild or moderate, up to you), undrained
  • 1 teaspoon salt
  • 1 teaspoon ground cumin
  • 1 teaspoon dried oregano
  • 1/4 teaspoon pepper (add more if you like spice)
  • Dash of cayenne pepper (add more if you like spice)
  • 1 cup (8oz) sour cream (I use the light version)
  • 1/2 cup heavy whipping cream

Directions:

  1. In a round dutch oven (or large, heavy saucepan), saute the oil, garlic powder, onion, and chicken until chicken is no longer pink. (If using precooked chicken, wait until the onions are soft, then add the chicken and stir for about a minute longer to warm.)
  2. Add the beans, broth, chilis, and seasonings. Bring to a boil. Reduce heat and simmer uncovered for 30 minutes.
  3. Remove from heat and stir in sour cream and heavy cream.
  4. Serve with cornbread and apple wedges. Mmmm!

Pictures coming tomorrow of our ebullient trick or treaters. Any guesses on the costumes?

In the meantime, here’s oh-so-obliging Dusty, after Ro and Ree found a doggie pumpkin costume for $2.79 in the Michael’s clearance bin. You KNOW we had to get it at that price, right?

999516_595884607152211_173207444_n

Saturday, January 26, 2013

Red Lentil Coconut soup

Had a big pot of this bubbling on the stove last night:
DSC_7459LR

Mmmmm, it was good!
DSC_7476

If you want to make your own, here’s all the stuff you’ll need:
DSC_7453LR

I mostly went by this recipe. The one big thing I’d add would be 1/3 cup golden raisins at the same time as the onions. I saw that in the original version of the recipe, which was very similar to this one but was a little too complicated for me. We weren’t sure we’d like the taste with the raisins, so we sprinkled them on top instead, but all agreed they were keepers.

Red Lentil Coconut Soup

Ingredients:

  • 1 to 1-1/2 Tablespoons olive oil (I started with 1 and then had to add a splash more because my pot was so big)
  • 1 to 2 Tablespoons curry powder, depending on how much you love curry (I used 1T)
  • 1/2 tsp cinnamon
  • 1 onion, chopped (I used about 3/4 of the onion because it was big and I was worried the girls would protest – turned out they liked the onions because they absorbed the sweetness)
  • 1/3 cup of golden raisins
  • 2 large carrots, peeled and diced
  • 2 tsp fresh ginger, grated
  • 2 garlic cloves, chopped
  • 2 tsp salt
  • 1 tsp sugar
  • 1/3 cup tomato paste
  • 7 cups water (this is a lot, use a BIG pot)
  • 1 (15oz) can coconut milk
  • 2 cups split red lentils (uncooked and unsoaked)
  • 1 (15oz) can garbanzo beans (chickpeas), drained
  • 1 Tablespoon lime juice
  • Optional: fresh cilantro and lime wedges for serving

Directions:

  1. To a large pot or dutch oven over medium heat, add the oil. Add the curry powder and cinnamon and cook, stirring often, until the spices are fragrant, about 2 minutes. (This soup makes A LOT, so use a big pot. I used my grandma’s dutch oven.)
  2. Add the onion and raisins and cook about 3 minutes, followed by the carrots, ginger, garlic, salt, sugar, and tomato paste. Cook, stirring, for 2 minutes more. (I find it easiest to chop and measure out everything in advance. So I had the onions in one bowl and the carrots, ginger, etc. in another – see the pic above.)
  3. Pour in the water, coconut milk, lentils, and chickpeas. Stir and bring to a simmer. Cook uncovered, stirring occasionally, for 25 minutes or until the lentils are tender and the soup has thickened.
  4. At the very end, stir in the lime juice. Serve with fresh cilantro and lime wedges if desired.

Tasty! Serve with yummy crusty bread or naan. This was great leftover the next day for lunch and I also froze a container of it for later.

Monday, November 5, 2012

And it shall forever after be known as “corn cake” in this house

Tried a recipe for corn casserole recently and thought there was a fifty-fifty chance that our picky girls would refuse to even taste it. Well I’m happy to report that I was totally and completely wrong. They inhaled this thing and gleeful called it “corn cake.” Ree even wrote in her school spelling sentences that week that she got to have cake for dinner. (Sometimes I wonder what those teachers think of us. But I probably really don’t want to know...)

Anyhow, this would make the perfect side at a Thanksgiving dinner, so here it is. Hope your family enjoys it as much as we did.

DSC_2720LR2DSC_2729LRw

Corn Casserole (AKA: Corn Cake)

1 15-ounce can whole-kernel corn (with juice, don’t drain)
1 15-ounce can cream-style corn
1 cup sour cream
1/4 cup sugar
2 eggs, beaten lightly
1/2 cup melted butter
1 8-ounce box Jiffy corn muffin mix

The easy-peasy instructions: Mix everything together in a big bowl, adding the muffin mix last. Pour into a large ungreased casserole pan (something around 9x13, I use our glass lasagna pan). Bake at 350 degrees for 60 minutes (or maybe even longer, check to see that it’s set up). Let stand 5-10 minutes before serving.

(printable recipe)

Monday, October 29, 2012

Let’s eat pumpkin!

DSC_4119LRFall and pumpkins just go together like peas and carrots, don’t they?

As soon as the weather even hints at chilly we adore chowing on pumpkin anything – bread, cake, muffins, pancakes, pie, and, of course, Pumpkin Dump Cake

Last night Ro wanted to make Pumpkin Dump Cake all by herself, so I handed her the recipe and sat back and waited for my plate of deliciousness.

Mmmmmm, love that stuff. DSC_4109LR

Sprinkling the cake on top is always fun (and I’ve noticed that Ro likes to lick her fingers afterwards when she thinks I don’t notice).

While Ro was busy baking, I made a couple dozen mini jack-o’-lanterns for her class party. Just wash your cutie oranges (or clementines) with a little bit of dish soap and warm water (scrub lightly with a veggie brush), dry them off, then make cute faces with a Sharpie marker. You’ll need more than one marker, because the wax still gets in your way a little:
DSC_4166LR copy

Bing, timer went off! The whole house smells SO GOOD:
DSC_4193LR

Now this is the hard part: let it cool and set up a little bit before ripping into it. Ok, you know I totally fail on that whole waiting part and end up with a steaming-hot bowl of pumpkin pudding. But there’s always the second piece to photograph for breakfast in the morning...
DSC_4194LR

Mmmmmmmmm. I posted the recipe for this one before (and it’s cute to see the little bakers), but didn’t include pictures, so hope this will help.

Pumpkin Dump Cake (printable recipe)
1–29 oz. can pumpkin (note, this is the big can, two small cans will also work)
1 –12oz. can evaporated milk
3 eggs
1 C. sugar
1 tsp. salt
1 T. cinnamon

Mix above ingredients and pour into 10 x 14 cake pan, ungreased.  (I use my glass lasagna pan.)

Then:
1 box yellow cake mix – sprinkle over pumpkin mixture
1 C. finely chopped pecans – sprinkle onto cake mix
¾ C. melted butter – pour over everything
Bake at 350 for about 50 minutes (or longer -- until a knife in the center comes out clean, like a pumpkin pie – if you use a slightly smaller pan your cake will be thicker and will need to cook a little longer). I cooked this one last night for 55 minutes and I think it still could have gone a few minutes longer. Also, your pecans should be chopped a little finer than in these pics. I tried to fix them but got shooed out of the kitchen.

Thursday, October 18, 2012

White Chicken Enchiladas (chicken, cheese, chiles)

These were such a HUGE hit with my family. Even with the two shortest members, who really would prefer to eat white rice, plain pasta (no butter no cheese), and bread all day long. (Sigh...) But Ro and Ree took one taste of these, yelled “LOVE!” in unison and scarfed them down. I was kind of shocked.

Well shoot, could you resist this?!
DSC_3769LR

Mmmmmmm:
DSC_3774LR

I got the recipe from Pinterest (where else?) and followed the instructions pretty well. I always end up changing a few things when trying new recipes (not because the original recipes are lacking at all, but, to be honest, because I skim while reading or am out of certain vital ingredients, or things kind of get out of hand in the kitchen. Whatever...). Oh well, here’s how I made these:

White Chicken Enchiladas (chicken, cheese, chiles)
8-10 medium flour tortillas in soft-taco size
2 cups shredded rotisserie chicken (so it’s already cooked and spiced, I left tiny pieces of the skin on when I shredded it because I wanted the flavor)
2 cups shredded Monterey Jack cheese
3 Tbsp. butter
3 Tbsp. flour
2 cups chicken broth (it’s one can, if you’re buying cans)
1 cup sour cream
1 (4 oz) can mild diced green chiles, undrained (don’t skip the chiles – seriously they really make the flavor of this dish and aren’t spicy, even hate-anything-green kids will like it)

1. Preheat oven to 350 degrees.

2. Spray Pam in a 9x13 pan.

3. Mix together chicken and 1 cup cheese. Roll meat/cheese up in tortillas and place in pan. (I could only fit 8 in there. If you make them skinnier you could fit 10, but I kind of like heftier enchiladas.)
4. In a sauce pan, melt butter, stir in flour, and cook 1 minute. Add broth and whisk until smooth. Heat over medium heat until thick and bubbly.

5. Turn the heat way down, then stir in sour cream and chiles. Do not bring to boil, you don't want curdled sour cream.

6. Pour mixture over enchiladas and top with remaining 1 cup of cheese.

7. Bake 22 min and then broil for 3 minutes to brown the cheese.
Dig in and enjoy!!

PS: How the heck do you spell “green chiles” in your house? I looked it up on the web and there are SO many variations: chillies, chilies, chiles, chili’s, chilis. Crazy. In the end I just went with what it says on the cans in our pantry.

Tuesday, September 4, 2012

Cucumbers like the ones at P.F. Chang’s

The girls and I love ordering Shanghai Cucumbers whenever we visit P.F. Chang’s. They’re just so dang tasty! The last time we went, I told Ro and Ree that I’d Google the recipe after dinner, and we hit the jackpot with the official recipe released by the restaurant (check it out here). I ran to the store to get sesame oil, and Ro (our resident chef-in-training) made it all herself (except for the knifework).

DSC_2176LRDSC_2187LR

Here they are “marinating” for a few minutes:DSC_2199LR

Pretty proud of herself:
DSC_2196-EditLR

The recipe was tasty and easy to follow. Definitely making it again, and here’s what we’ll do differently next time, see italicized notes:

P.F. Chang’s Shanghai Cucumbers

Ingredients:

12 oz. Peeled and Seeded Cucumbers, cut into 1” pieces (We used 3 big cucumbers, which was great but I’d cut them differently next time – slicing each cucumber in half and then half again, then slicing each strip into 1-inch chunks. My bad this time, I couldn’t remember what they looked like in the restaurant since we inhale them so quickly.)
1.5 oz. Gluten Free Soy Sauce (we only had a sorta blah low-sodium one in the fridge, but I’m getting a real-deal soy sauce for next time)
1 tsp. White Vinegar
¼ tsp. Sesame Oil (Ro and I adore the flavor of this stuff, so we’ll add a tiny bit more next time)
½ tsp. Toasted Sesame Seeds (next time these are getting a quick whirl in a hot saute pan to bring out the flavor even further, I’ll have to help with that part)

Procedure:

1. Mix together the sauce ingredients (Ro added the sesame seeds right to the sauce and it was fine)
2. Mix sauce together with the cucumbers
3. Sprinkle sesame seeds over the top
We ate these immediately (Ro and Ree even licked the bowl), but they’d be even better with an hour of marinating to really soak up the flavor.

PS: If you have a favorite brand or type of soy sauce, please share. I’m heading out shopping tomorrow.

Wednesday, August 8, 2012

What’s for dinner tonight

DSC_1689LR

Grilled steak with our favorite steak marinade, Italian Oven-Roasted Potatoes, and Sherry Cherry Tomatoes. I’ve linked to our steak marinade before, but haven’t posted the two side recipes, so here they are:

Italian Oven-Roasted Potatoes

4 small potatoes
3 TB olive oil
1 TB Italian seasoning (dried herbs in the spice aisle)
1 tsp kosher salt
Parmesan cheese

Slice potatoes into thin slices (1/4 inch, I use a mandolin slicer gizmo that I bought at TJ Maxx and am probably going to cut off a finger with one day but boy does it make neat rippled slices). In a big ziploc bag, toss the potato slices, olive oil, Italian seasoning, and salt. Shake it all around to evenly coat all the slices. Lay your potato slices in a single layer on baking sheets lined with foil (I end up having to use 3 baking sheets). Bake in a convection oven at 425 for 15-20 minutes (until lightly brown). Sprinkle parmesan cheese lightly on each slice then bake for an additional 5 minutes. (Note, if you don’t have a convection oven, bake at 450 and rotate the pans a few times so they get evenly browned.)

Sherry Cherry Tomatoes

2 TB olive oil (or more if needed to coat the bottom of the pan well)
3 cloves garlic, finely chopped (we use the pre-minced stuff that comes in a jar – 1/2 tsp = 1 clove)
1 small onion, finely chopped
1 pint cherry tomatoes (I used yellow here, but red would be better and a smidge less sweet)
2 TB dry sherry wine
1 tsp sugar
Salt to taste (I used about 1/2 tsp)

Preheat oven to 375 degrees. Preheat a skillet over medium heat. Add your olive oil, garlic, and onion. Stir them around for 2 to 3 minutes then add cherry tomatoes. Stir to coat well. Add sherry, sugar, and salt. Stir well again. Then pop the whole mixture in a small roasting pan (I used a pie tin covered with foil because I didn’t have anything small enough) and roast for about 20 minutes.

Mmmm mmmmm.

Ok, now I’m curious – what did you have for dinner tonight? I love hearing about what people are putting on the table.

IMG_2763LRPS: Keeping it honest – yesterday we pulled the wooden trays up to the tv, had frozen tv dinners, and watched a movie. By the way, this (???!!!) is how the girls watched the movie, which was How to Train Your Dragon. To say they LOVED it is probably an understatement. Put it this way: they couldn’t decide if they liked this movie or Brave better, which is saying a lot!

Tuesday, June 5, 2012

Staff appreciation gifts are ready!

The little girls were all pumped up to make homemade gifts for those folks at their school who take such good care of them. So we decimated the kitchen today in the name of love. Pumpkin Chocolate-Chip Bread love, to be specific. And boy does it smell good! 

DSC_4984LRDSC_4979LRDSC_4990LR

Mmmmm. The girls immediately ripped into one of the loaves (because Ro said they couldn’t possibly give something as a gift if they didn’t know whether it was good or not) and said “LOVE!” and “infinity thumbs up!

DSC_4998LR

Whew. With those enthusiastic stamps of approval, these little bundles will be delivered to school tomorrow for their teacher*, our friends in the office, the principal, the custodian, and the music teacher.

DSC_5009-Edit-EditLR

Now I think I’ll go nibble on the remaining crumbs of our sample loaf and call it dinner...

Pumpkin Chocolate-Chip Bread

Ingredients
3 cups canned plain pumpkin puree
1 1/2 cups vegetable oil
4 cups white sugar
6 eggs
4 3/4 cups all-purpose flour
1 1/2 teaspoons baking powder
1 1/2 teaspoons baking soda
1 1/2 teaspoons salt
1 1/2 teaspoons ground cinnamon
1 1/2 teaspoons ground nutmeg
1 1/2 teaspoons ground cloves
1 cup Ghirardelli mini chocolate chips

Directions
Preheat the oven to 350 degrees. Grease three 9x5” loaf pans. In a large bowl, mix together the pumpkin, oil, sugar, eggs, and chocolate chips. In another bowl, combine the flour, baking powder, baking soda, salt, cinnamon, nutmeg, and cloves. Stir dry mixture into pumpkin mixture until well blended. Divide the batter evenly between the prepared pans. Bake in preheated oven for 45 minutes to 1 hour (our loaves were done in exactly 49 mins). The top of the loaf should spring back when lightly pressed. (Makes 3 loaves.)

(Printable recipe)

* Shhh, don’t tell, but she’ll get a humungo class gift and hand-written/hand-drawn cards from each kiddo on the last day of school – which is in two and a half days squeeeeeeal! The girls just wanted her to have their bread too.

Tuesday, May 29, 2012

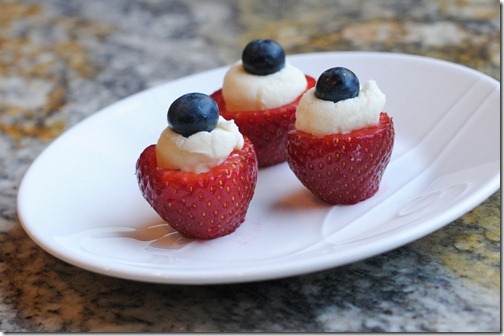
Red, white, and blue berries

Saw variations on these berries quite a few times on Pinterest, and thought they’d be perfect for Memorial Day. They were. *grin*DSC_4329LR

We ended up loosely following the directions here. Cut the bottom and top off 2 dozen strawberries, then use a small melon baller to scoop a hole inside each berry.

Beat together 8oz mascarpone cheese, 3 TB powdered sugar, 1 tsp vanilla. Then let your helper lick the beaters (of course):DSC_4298LR

Stuff the mixture into a pastry bag (or ziploc bag with the tip cut off). Saw a neat unrelated glass trick (also on Pinterest) to hold a bag while filling. Genius:DSC_4303LR

Squeeze a dab of the creamy mixture inside each strawberry, then top with a blueberry:
DSC_4308LRDSC_4319LR

Store in the fridge.

Yum, these were so delish, and definitely easy! We’ll be making them again for the 4th of July for sure!DSC_4330LR

If you’d like to see other ideas I’ve pinned for our 4th of July party, they’re here.

Sunday, May 27, 2012

Do you like mojitos? Then you’ll love this mojito marinade.

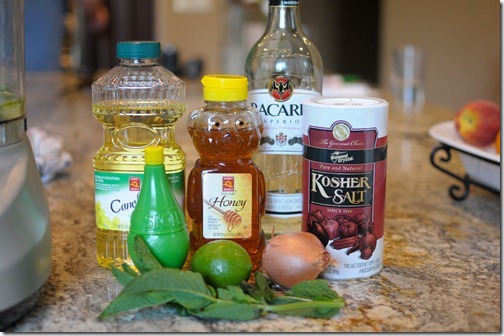
Everyone knows how much I appreciate a good mojito. Mmmm, wish I had one right now. And we all know how much TubaDad likes grilling. So I was pretty dang excited to find a fun new grilling recipe for Mojito Marinade for Chicken. Oh yeah! We’ve road-tested it a couple of times now and it’s a keeper, with thumbs-up from every member of the family. Here’s how we made it:

Assemble a few simple ingredients -- canola oil, lime juce, lime zest, fresh mint, honey, shallots, rum, kosher salt:DSC_4099LR

Put on your chef outfit (I was thinking something like jeans and an apron, but apparently they thought these getups were more appropriate. Whatev...):DSC_4113-EditLR

Throw everything in a food processor and chop it up:DSC_4118LR

Put your chicken in a glass container and pour the marinade over it. Let it sit for 20-30 minutes (we also tried the marinade on Mahi Mahi and it was good too, although it rocked on the chicken):
DSC_4133LRDSC_4183LR

If you’re wearing a fun outfit and have a pink car, might as well take a joyride while the meat is marinating and your parents are cleaning up the kitchen:DSC_4122LRDSC_4128LR

Then toss your meat on the barbie and grill away:DSC_4181LRDSC_4186LR-2

Yum! And of course this is perfect paired with tall glasses of fresh mojitos.

Mojito Marinade for Chicken Recipe

Ingredients:
- 2 shallots, peeled and coarsely chopped
- 1/4 cup coarsely chopped fresh mint
- 1/4 cup rum
- 1 TB lime zest
- 1/2 cup lime juice
- 1 TB kosher salt
- 2 TB canola oil
- 3 TB honey
- boneless chicken breasts (can also use firm fish filets like Mahi Mahi, which were good, although our family fave was the chicken)

Instructions:
1. Place shallots, mint, rum, lime zest, lime juice, salt, oil, and honey (in this order) in a food processor.
2. Pulse until shallots are finely chopped.
3. Put your chicken in a glass (non-reactive) container in a single layer.
4. Pour the marinade over the meat.
5. Cover with plastic wrap and refrigerate 30 minutes up to overnight. (If using fish, marinate for no more than 30 minutes or it might get mushy.)
6. Grill and thrill

(Printable recipe)

Monday, February 6, 2012

Superbowl eating, uh I mean watching

Every year we watch the Superbowl with family. Well some of us watch the game, the rest of us eat, talk, play, and watch the commercials... I fall into the latter category.

DSC_0226LRDSC_0223LRDSC_0254LRDSC_0237LRDSC_0249LR

This year I tried a new recipe for appetizers – Pizza Puffs -- and they were gone so fast I didn’t even get a picture. Oops. Super easy to make, super popular, and next time I’m doubling the recipe.DSC_0235LR

Here’s a picture of what I was going for (picture credit Lick the Bowl). Mine looked similar, so just imagine that’s what we ate. Mmmm, wish I had a few more right now. That’s a great blog for recipes, by the way, check it out.

Pizza Puffs adapted from Lick the Bowl

  • 3/4 cup flour
  • 3/4 teaspoon baking powder
  • 1 tablespoon Italian seasoning (if you don’t have this in your pantry, make your own by combining equal amounts of dried basil, marjoram, oregano, rosemary, thyme)
  • 1/4 tsp of salt
  • 3/4 cup whole milk
  • 1 egg, lightly beaten
  • 1 cup shredded mozzarella cheese
  • 1/4 cup freshly shredded parmesan cheese (the kind that’s in long pieces, instead of powder)
  • 1 cup mini pepperoni pieces (they’re sold as teeny little rounds, so no need for cutting)
  • 1/2 cup store-bought pizza sauce

1. Preheat the oven to 375 degrees. Grease your mini-muffin pans (I used one 24-muffin pan and one 12-muffin pan). In a large bowl, whisk together the flour, baking powder, Italian seasoning, and salt. Whisk in the milk and egg. Stir in the mozzarella, Parmesan and pepperoni; let stand for 10 minutes.

2. Stir the batter and fill each mini-muffin cup about 3/4 full. I had enough batter for 28 mini muffin cups. Bake until puffed and golden, 20 to 25 minutes.

3. Microwave the pizza sauce until warmed through. Serve the puffs with the pizza sauce for dipping.

4. If you’re feeding a crowd, double this recipe (at least). Just sayin...

After the game we had Superbowl Sundaes. Basically we set a long table with various icecream and topping choices and let everyone roll their own. Cheers!

Thursday, February 2, 2012

Recipe: Chicken macaroni bake

I grab a rotisserie chicken at the grocery store almost once a week and then we have yummy chicken one night and something with the leftovers the next night. Here’s one tasty way we use up the extra chicken.

DSC_0217LR

Chicken Macaroni Bake

Ingredients:

1/4 cup chopped onions
2 TB butter
1/4 cup milk
1 can cream of chicken soup
1 and 1/2 cups chopped chicken
4 ounces shredded cheddar cheese
8 ounces pasta (I use rotini)
1/4 cup buttered bread crumbs (I use Panko breadcrumbs, which are bigger, if you use regular bread crumbs use about half this amount)

Directions:

Preheat oven to 350. Prepare pasta according to package directions. Brown onion in butter in a large frying pan. Stir in soup, chicken, milk, 3/4 cups of cheese (you’ll have a bit leftover for the topping). Heat until the cheese melts. Mix in the cooked pasta. Pour into a greased baking dish (I use the lasagna size but you could also use a square one and just have a thicker casserole). Mix the remaining cheese and bread crumbs and sprinkle on top. Bake at 350 for 30 minutes. Keep an eye on it, and if it starts to dry out and you don’t want that* cover with foil for the last 10-15 minutes.

The ingredients can be doubled (we did it for the superbowl) and the casserole will still work just fine in a lasagna pan.

(*I adore the crispy cheese parts, and my kids don’t like anything “soupy” or “casseroley,” so I don’t cover mine at all and we enjoy it somewhat dry.)

Wednesday, November 23, 2011

It’s almost 10 o’clock? You have got to be kidding me!

We just finished mixing up our Pumpkin Dump Cakes for tomorrow, one for my mom’s house and one for our cousins’ house, and didn’t even look at the time until we popped them in the oven. Gah!

DSC_9595LR

They have to bake for at least an hour. Gah again!
At least the girls had fun whipping them up. Since we were making two cakes, they each got to do everything in their very own bowls and pans.

DSC_9586LR

They are both quite serious when they’re stirring. Oooo, so serious.
DSC_9589LR

The whirling swirl behind Ree is her sister, who was dancing with joy that they accidentally got to stay up so late:
DSC_9600LR

Thanks for the culinary help, cuties:
DSC_9594LR

The stuff is delicious, like a gooey pumpkin pudding with a hint of cake. If anyone needs the recipe (which is my mom’s), here tis:

Pumpkin Dump Cake (printable recipe)

1–29 oz. can pumpkin
1 –12oz. can evaporated milk
3 eggs
1 C. sugar
1 tsp. salt
1 T. cinnamon

Mix above ingredients and pour into 10 x 14 cake pan, ungreased.

Then:
1 box yellow cake mix – sprinkle over pumpkin mixture
1 C. chopped pecans – sprinkle onto cake mix
¾ C. melted butter – pour over everything

Bake at 350 for 45 to 50 minutes (or until a knife in the center comes out clean, like a pumpkin pie – if you use a slightly smaller pan your cake will be thicker and will need to cook a little longer)

Happy Thanksgiving tomorrow, hope you all have a wonderful day with family and friends and you eat too much, and laugh even more.